#how to install php 7.3 on ubuntu
Explore tagged Tumblr posts
Visit Tumblr Blog
Explore Tumblr blogs with no restrictions, modern design and the best experience.
Last Seen Tumblr Blogs


Fun Fact
In 2020, Tumblr had 29.4 million users in the US.
Link
#install php ubuntu#install php 7.2 ubuntu#how to install php 7.3 on ubuntu#install php on ubuntu#install latest php version on ubuntu
1 note
·
View note
Text
This short tutorial is for installing PH... https://www.computingpost.com/how-to-install-php-7-3-on-debian-9-debian-8/?feed_id=19266&_unique_id=63743efc9fd99
0 notes
Text
Convert PDF to Image Tutorial Example in Laravel 9

Example of Laravel 9 PDF to Image conversion. You will discover how to use the Laravel 9 app to convert PDF to Image in this tutorial. You will first learn how to install the imagick package. Additionally, find out how to make the Imagick package available in Apache. Install Laravel 9 App To install the Laravel 9 app, first open your terminal OR command prompt and type the following line: composer create-project --prefer-dist laravel/laravel blog
Installing Imagick PHP Extension And Configuration
The Imagick PHP extension is now installed using the following command in the terminal, which may be found in the Ubuntu repositories: sudo apt install php-imagick The apt list command can be used to check the list of versions that are available from the Ubuntu repository. sudo apt list php-magick -a Apt is instructed to list every version of a package that is available from the repositories via the -a flag. There is only one version accessible as of the time of this writing, and the output will resemble the following. php-imagick/bionic,now 3.4.3~rc2-2ubuntu4 amd64 restart apache web server After that, restart Apache web server: sudo systemctl restart apache2 Verify Installation Run the next command to confirm the installation: php -m | grep imagick The name of the module imagick will be the only line in the output of the command if the installation was successful. imagick Use the phpinfo() method for a much more thorough verification of whether the PHP module was correctly installed. Run the following command on the command line. php -r 'phpinfo();' | grep imagick This will produce the information displayed below, with the module's status indicated as enabled. /etc/php/7.3/cli/conf.d/20-imagick.ini, imagick imagick module => enabled imagick module version => 3.4.4 imagick classes => Imagick, ImagickDraw, ImagickPixel, ImagickPixelIterator, ImagickKernel imagick.locale_fix => 0 => 0 imagick.progress_monitor => 0 => 0 imagick.set_single_thread => 1 => 1 imagick.shutdown_sleep_count => 10 => 10 imagick.skip_version_check => 1 => 1 Alternatively, you can view a php script by adding the phpinfo() function to it and running it from a web browser. You can now see that the module has been installed and turned on. Following certain authorisation changes, the path /etc/ImageMagick-6/policy.xml < policy domain="coder" rights="none" pattern="PDF" / > To Convert < policy domain="coder" rights="read|write" pattern="PDF" / >
Add Route
Add routes for the Laravel 8 app's PDF to Image Converter in this stage. Therefore, open "routes/web.php" and add the following route. Read the full article
0 notes
Text
How to Install PHP on Ubuntu 20.04
How to Install PHP on Ubuntu 20.04
PHP 7.4 is the latest stable release available. Say thanks to Ondřej Surý for maintaining PPA of most the popular PHP versions on launchpad. If you want to install a specific or multiple version of PHP, then this article can be helpful for you. This article will help you to install PHP 7.4, 7.3, 7.2 and 5.6 on Ubuntu 20.04 (Focal Fossa) via PPA. Read: How to Install PHP 7 on Debian via PPA You…
View On WordPress
0 notes
Text
Installation and Migration Process to Magento 2 Platform
In the previous article, we have covered the understanding of Magento migration process. We learned about the review of the Magento 1 and the importance of extension. Let us move forward with the installation process of Magento 2.
The next step is to install Magento 2. Here is the list of the system tools you will need for the successful migration process.
Operating System: Must be a Linux x86-64 distribution such as Ubuntu or Debian. Windows or Mac does not support Magento installation or migration.
Memory: Minimum 2 GB of RAM is necessary to have.
Composer: This PHP package manager is used to install Magento elements.
Web Servers: Apache 2.4 along with enabled Apache mod_rewrite and mod_version modules and Nginx 1.x
Database: You must have one of each MySQL 5.6, 5.7, NDB Cluster 7.4; MariaDB 10.0, 10.1, 10.2 and Percona 5.7
PHP Version: PHP7.2 or 7.3 will support.
PHP Extensions: ext-ctype, ext-curl, ext-dom, ext-gd, ext-iconv, ext-intl, ext-mbstring,ext-bcmath, ext-openssl, ext-hash, ext-pdo_mysql, ext-simplexml, ext-soap, ext-xsl, ext-zip, lib-libxml
SSL: It requires a valid security certificate. Magento migration will not work with the self-signed certificates
Other System Accessories: bash, gzip, lsof, nice, sed, tar
Do a Test Run
Yes, as being a Magento development company, we advise you to do the actual test run before you actually opt for the migration process. It will save the countless time of yours to go back and fix errors. It will give a dedicated Magento developer a broad idea about where he might occur error and how to solve or how to get the guidance on it without extending downtime. Do not forget to copy your Magento 1 store to the temporary server and move the copy to Magento 2 to test the process out. Also, take the back up of all the data you have got till this point. Now we will move forward to complete the Magento migration process.
Use the Data Migration Tool
The data migration tool will require access to the databases of Magento 1 and 2. So, you have to open up the necessary ports in your firewall. It will require you to stop all the activities of the Admin panel. Though, It will not disturb the order management activities like shipping, invoice generation. It will work as it was working. After that, the dedicated Magento developer will move forward to transfer your setting and data to the Magento 2 platform. The developer will install the extensions of Magento 1 you want to keep for Magento 2 priorly.
Manual Data Migration
Do not be dependent on the data migration tool for everything. It can do the rest expect the four types of data. That includes:
Media
Storefront design
Admin user accounts
Access control lists
Magento development companies India developer can copy the media files directly from Magento 1 to (root)/pub/media folder in Magento 2. There is no need to copy .htaccess files from the Magento 1 to Magento 2 as it will already be there. The coping over will overwrite the files.
The Magento migration process will end here.
Go Live!
Now your Magento store is all set with updated settings, data and media. You can make it open for your web store visitors. Follow the listed steps to make it available for your visitors.
Activate the maintenance mode of Magento 1 to kick off the downtime of the website.
Move to data migration tool window and press CTRL +C. It will stop the incremental updates.
Go to Magento 2 platform and start all your scheduled jobs, reindex the stock indexer and cache the pages.
For the final step, Point your DNS, load balancers, etc. to your new production hardware.
Now, end the downtime as Your Magento 2 store is all ready to manage the visitor and your daily actions. For more information on migrating to Magento 2, contact top Magento development company India today.
0 notes
Text
OneinStack: How to install it on Ubuntu and CentOS
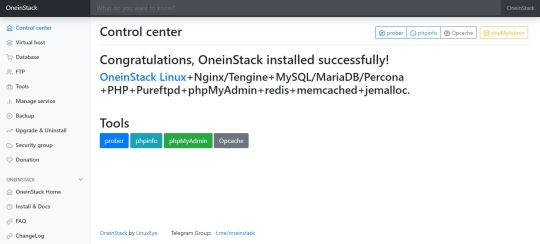
What is OneinStack? It is an active project that uses to set up an environment for the development of PHP/JAVA applications in just one-click on Linux operating systems such as CentOS (including Redhat), Debian, Ubuntu, Fedora, Deepin, Amazon Linux and other same family Distros. Just like WAMP or XAMPP server for Windows, OneinStack allows creating different Linux web server environment such as: Lnmp(Linux + Nginx+ MySQL/MongoDB+ PHP) Lamp(Linux + Apache+ MySQL/MongoDB+ PHP) Lnmpa (Linux + Nginx+ MySQL/MongoDB+ PHP+ Apache): Nginx handles static, Apache handles dynamic PHP Lnmt (Linux + Nginx+ MySQL/MongoDB+ Tomcat): Nginx handles static, Tomcat (JDK) handles JAVA Lnpp(Linux + Nginx+ PostgreSQL+ PHP) Lapp(Linux + Apache+ PostgreSQL+ PHP) Lnmh(Linux + Nginx+ MySQL+ HHVM) All the above-mentioned web servers combination can be installed using pre-given OneinStack script. OneinStack updates are timely which makes it very reliable to use. The script of OneinStack provides a wide range of features such as: All the command and auto installation will be done in Terminal only using the command line. Good for server usage. Most of the time up to date. Some security optimization Wide range of database versions (MySQL-8.0, 5.7, 5.6, 5.5; MariaDB-10.4, 10.3, 10.2, 5.5, Percona-8.0, 5.7, 5.6, 5.5, AliSQL-5.6, PostgreSQL, MongoDB) Multiple PHP versions (PHP-7.3, 7.2, 7.1, 7.0, 5.6, 5.5, 5.4, 5.3) Provide Nginx, Tengine, OpenResty and ngx_lua_waf Tomcat version (Tomcat-9, Tomcat-8, Tomcat-7, Tomcat-6) JDK version (JDK-11.0, JDK-1.8, JDK-1.7, JDK-1.6) Apache version (Apache-2.4, Apache-2.2) OneinStack provides option to install PHP Cache Accelerator provides ZendOPcache, xcache, apcu, eAccelerator. And php extensions, include ZendGuardLoader, ionCube and more... can be installed with one click. Installation of Pureftpd, phpMyAdmin, memcached, redis Provide upgrade script for above-mentioned tools Virtual host script Support local, remote(rsync between servers), Aliyun OSS, Qcloud COS, UPYUN, QINIU, Amazon S3, Google Drive and Dropbox backup script And more... It also comes with the Let's Encrypt certificate that means those want to use the SSL certificate for their project; just only need to enter the domain name with you want to use SSL. After that, it automatically configures the SSL certificate for the domain name. Moreover, OneinStack will also set the auto-renewal of Let's Encrypt certificate. The OneinStack project is available on GitHub and free to download, install and use.
Read the full article
0 notes
Text
How to install php 7.2 or 7.3 on ubuntu
https://www.tutsmake.com/install-php-7-on-ubuntu-18-04-php-7-2-3/
1 note
·
View note
Text
This guide will help you Install PHP 7.3... https://www.computingpost.com/install-php-7-3-on-ubuntu-18-04-ubuntu-16-04-debian/?feed_id=19250&_unique_id=63743e61bb07d
0 notes
Link
0 notes
Text
Linux - Cara Instal PHP 7.3
Linux – Cara Instal PHP 7.3
Tutorial singkat ini adalah untuk menginstal PHP 7.3 pada Debian 9 (Stretch) dan Debian 8 (Jessie). PHP 7.3 hadir dengan sejumlah perbaikan bug, fungsi dan fitur baru dan deprecations.
Perbarui sistem dan Instal add-apt-repository
Sebelumnya pastikan sudah mengupdate sistem Anda.
sudo apt update sudo apt upgrade -y
jika Anda tidak memiliki perintah add-apt-repository yang tersedia di sistem Anda,…
View On WordPress
#Cara Instal PHP 7.3 di Debian 10#Cara Instal PHP 7.3 di Debian 8#Cara Instal PHP 7.3 di Debian 9#Cara Instal PHP 7.3 di Ubuntu#How to Install PHP 7.3 on Debian 9 / Debian 8
0 notes
Link
Install php 7.3 on Ubuntu 18.04
0 notes
Text
How to Install Apache with PHP-FPM on Ubuntu 18.04 LTS
How to Install Apache with PHP-FPM on Ubuntu 18.04 LTS
PHP FPM (FastCGI Process Manager) is an alternative implementation of PHP FastCGI. It provides some additional features like Adaptive process spawning which is useful for sites. This tutorial will help you to install Apache with PHP-FPM/FastCGI on Ubuntu 18.04 (Bionic) LTS system. In this tutorial, we are using PHP 7.3 and configure with Apache using PHP-FPM and FastCGI.
Install Apache with…
View On WordPress
0 notes
Text
Install latest version of PHP 7.3 on Ubuntu
Install latest version of PHP 7.3 on Ubuntu
[I]n this post I am going to explain to you how we can install PHP 7.3 in your Ubuntu. PHP 7.3 is under development and going to release soon, but we can install PHP 7.3 and test all the feature in the development phase using ondrej/php.
Please follow below steps to install the latest version of PHP 7.3
Step 1. Open the terminal and add ondrej/php package which has latest PHP version to add run…
View On WordPress
0 notes
Text
Hello good people!. Welcome to our guide... https://www.computingpost.com/how-to-install-php-7-3-on-centos-7-fedora/?feed_id=19234&_unique_id=63743d95aae35
0 notes
Text
Welcome to this guide on how to install and Manage WordPress Website on Linux using WordOps. WordPress is a free and open-source PHP-based Content Management System developed by Matt Mullenweg and Mike Little in 2003. This simple and extensive CMS is used to create powerful and appealing websites with no programming knowledge required. There are several methods to install WordPress as illustrated in the guides below: Setup WordPress Website on Arch Linux / Manjaro Install WordPress with Nginx on Ubuntu / Debian How To Setup WordPress Multisite on Ubuntu WordOps is a tool that eases the WordPress installation and site administration with the following features: Easy to install: One step automated installer with migration from EasyEngine v3 support Powerful: Optimized Nginx configurations with multiple cache backends support Up-to-date: PHP 7.2, 7.3, 7.4, 8.0 & 8.1 – MariaDB 10.5 & Redis 6.0 SSL support: Domain, Subdomain & Wildcard Let’s Encrypt SSL certificates with DNS API support Custom Nginx build: Nginx 1.18.0 – TLS v1.3 Cloudflare HTTP/2 HPACK & Brotli support Fast deployment: Fast and automated WordPress, Nginx, PHP, MySQL & Redis installation User Friendly: WordOps dashboard with server status/monitoring and tools demo Offers Monitoring: Live Nginx virtual host traffic with ngx_vts_module and server monitoring with Netdata System Requirements WordOps can be installed on the following systems: Ubuntu 20.04 LTS (Focal) Ubuntu 18.04 LTS (Bionic) It is also compatible with the following systems. Debian 9 (Stretch) & Debian 10 (Buster) Raspbian 9 (Stretch) & Raspbian 10 (Buster) 1. Install WordOps on Linux WordOps can be installed using the command: wget -qO wo wops.cc && sudo bash wo Sample Output: Welcome to WordOps install/update script v3.14.1 Installing wo dependencies [OK] Installing WordOps [OK] Running post-install steps [OK] WordOps (wo) require an username & and an email address to configure Git (used to save server configurations) Your informations will ONLY be stored locally Enter your name: admin Enter your email: [email protected] Synchronizing wo database, please wait... WordOps (wo) installed successfully To enable bash-completion, just use the command: bash -l To install WordOps recommended stacks, you can use the command: wo stack install To create a first WordPress site, you can use the command: wo site create site.tld --wp WordOps Documentation : https://docs.wordops.net WordOps Community Forum : https://community.wordops.net WordOps Community Chat : https://chat.wordops.net Give WordOps a GitHub star : https://github.com/WordOps/WordOps/ 2. Install WordPress using WordOps. Creating a WordPress site using WordOps is so easy. The below command can be used to create a WordPress site on your domain name. sudo wo site create domain_name --wp When creating a site, you can specify the PHP version, Redis cache, cache enabler e.t.c using the below flags. # install wordpress with latest PHP 8.0 without any page caching sudo wo site create example.com --wp #install wordpress with PHP 8.1 without any page caching sudo wo site create example.com --wp --php81 # install wordpress + nginx fastcgi_cache sudo wo site create example.com --wpfc # install wordpress + nginx redis_cache sudo wo site create example.com --wpredis # install wordpress with WP-Rocket plugin sudo wo site create example.com --wprocket # install wordpress with Cache-enabler plugin sudo wo site create example.com --wpce # install wordpress with wp-super-cache plugin sudo wo site create example.com --wpsc To create a WordPress site with multisite with subdirectory, add the --wpsubdirflag to the above commands. For example, to install wpmu-subdirectory with the wp-super-cache plugin, the command will be: wo site create example.com --wpsubdir --wpsc
Also, you can create a WordPress multisite with a subdomain using the --wpsubdomain flag for example: wo site create example.com --wpsubdomain In this guide, I will demonstrate how to create a WordPress site on wordpress.example.com with PHP8.0. The command will be; sudo wo site create wordpress.example.com --wp Sample command execution output: This command installs and configures Nginx, MySQL database, PHP, and WordPress. Once complete, view the info about your site: sudo wo site info wordpress.example.com Sample Output: 3. Access the WordPress Site Access the WordPress site using the URL http://domain_name Visit the WordPress admin console with the URL http://domain_name/wp-admin On this page, log in using the created credentials provided during the installation. On successful authentication, you should see the WordPress admin dashboard as below. Once here, change the default password for the admin user, to create one of your own. Navigate to the users tab and click edit for the admin user. Set the preferred password and save the changes. That is it! You have successfully set up the WordPress Website on Linux using WordOps. 4. Manage WordPress Website on Linux using WordOps There are other configurations/management options you can easily make to your WordPress site with WordOps. The configuration you can make are; Switch between PHP versions With WordOps, you can easily switch between PHP versions on your created WordPress site. The possible commands are: # Switch to PHP 7.2 sudo wo site update example.com --php72 # switch to PHP 7.3 sudo wo site update example.com --php73 # switch to PHP 7.4 sudo wo site update example.com --php74 # switch to PHP 8.0 sudo wo site update example.com --php80 # switch to PHP 8.1 sudo wo site update example.com --php81 For example, switching our created site to PHP 8.1, we will use the command: sudo wo site update wordpress.example.com --php81 Sample Output: If you get an error “Oops Something went wrong!!“, view the logs using the command: $ tail /var/log/wo/wordops.log E: Could not get lock /var/lib/dpkg/lock-frontend. It is held by process 32655 (unattended-upgr) E: Unable to acquire the dpkg frontend lock (/var/lib/dpkg/lock-frontend), is another process using it? 2022-04-23 11:33:23,782 (INFO) wo : Oops Something went wrong!! Kill the process, then proceed and update the PHP version sudo kill -9 32655 sudo wo site update wordpress.example.com --php81 Once the upgrade is successful, verify the new PHP version using the command: sudo wo site info wordpress.example.com Sample Output: Secure WordPress with Let’s Encrypt You can use WordOps to secure the created site with Let’s Encrypt SSL certificates. Normally, the -le flag is used to issue Let’s Encrypt SSL certificates for your domain name. The possible commands here are: # Install wordpress & letsencrypt wo site create example.com --wp -le # Install wordpress & letsencrypt subdomain wo site create sub.example.com --wp -le # Install wordpress & letsencrypt with HSTS wo site create example.com --wp --letsencrypt --hsts # Install wordpress & wildcard SSL certificate with Cloudflare DNS API wo site create example.com --wp -le=wildcard --dns=dns_cf You can also issue Let’s Encrypt certificates manually by installing the required packages and proceeding as below: sudo apt install certbot python3-certbot-nginx sudo certbot --nginx Sample Output: Saving debug log to /var/log/letsencrypt/letsencrypt.log Plugins selected: Authenticator nginx, Installer nginx Enter email address (used for urgent renewal and security notices) (Enter 'c' to cancel): [email protected] - - - - - - - - - - - - - - - - - - - - - - - - - - - - - - - - - - - - - - - - Please read the Terms of Service at https://letsencrypt.org/documents/LE-SA-v1.2-November-15-2017.pdf. You must agree in order to register with the ACME server at https://acme-v02.api.letsencrypt.org/directory
- - - - - - - - - - - - - - - - - - - - - - - - - - - - - - - - - - - - - - - - (A)gree/(C)ancel: a - - - - - - - - - - - - - - - - - - - - - - - - - - - - - - - - - - - - - - - - Would you be willing to share your email address with the Electronic Frontier Foundation, a founding partner of the Let's Encrypt project and the non-profit organization that develops Certbot? We'd like to send you email about our work encrypting the web, EFF news, campaigns, and ways to support digital freedom. - - - - - - - - - - - - - - - - - - - - - - - - - - - - - - - - - - - - - - - - (Y)es/(N)o: y Which names would you like to activate HTTPS for? - - - - - - - - - - - - - - - - - - - - - - - - - - - - - - - - - - - - - - - - 1: wordpress.example.com 2: www.wordpress.example.com - - - - - - - - - - - - - - - - - - - - - - - - - - - - - - - - - - - - - - - - Select the appropriate numbers separated by commas and/or spaces, or leave input blank to select all options shown (Enter 'c' to cancel): 1 Requesting a certificate for wordpress.example.com Performing the following challenges: http-01 challenge for wordpress.example.com Waiting for verification... Cleaning up challenges ... Please choose whether or not to redirect HTTP traffic to HTTPS, removing HTTP access. - - - - - - - - - - - - - - - - - - - - - - - - - - - - - - - - - - - - - - - - 1: No redirect - Make no further changes to the webserver configuration. 2: Redirect - Make all requests redirect to secure HTTPS access. Choose this for new sites, or if you're confident your site works on HTTPS. You can undo this change by editing your web server's configuration. - - - - - - - - - - - - - - - - - - - - - - - - - - - - - - - - - - - - - - - - Select the appropriate number [1-2] then [enter] (press 'c' to cancel): 2 .... Successfully received certificate. Certificate is saved at: a2enmod ssl /etc/letsencrypt/live/wordpress.example.com/fullchain.pem Key is saved at: /etc/letsencrypt/live/wordpress.example.com/privkey.pem This certificate expires on 2022-07-18. These files will be updated when the certificate renews. Certbot has set up a scheduled task to automatically renew this certificate in the background. - - - - - - - - - - - - - - - - - - - - - - - - - - - - - - - - - - - - - - - - If you like Certbot, please consider supporting our work by: * Donating to ISRG / Let's Encrypt: https://letsencrypt.org/donate * Donating to EFF: https://eff.org/donate-le - - - - - - - - - - - - - - - - - - - - - - - - - - - - - - - Once SSL certificates are generated, proceed and access the site via HTTPS Update WordOps to the latest version using the command: wo update Conclusion We have successfully gone through how to install and Manage WordPress Websites on Linux using WordOps. We can all agree that WordOps makes it easy to install and manage WordPress sites. I hope this was significant.
0 notes